In this article I am going to explain How to Rotate text in Vertical, Horizental, Angle Clock wise, Rotate text up and Rotate Text down..
Steps:
1) In the Excel sheet column you can type the text you want to Rotate.
2) Select the column and from the Home Tab click the Orientation button. It will dispaly all the text Roation options from the Orientation List. You can also right Click on the column and click on the Format Cells option and in the popup window you can the text rotation.
3) Now select the option which you need to align to the Text. The available options are Align Counterclockwise, Align Clockwise, Vertical Tex, Rotate Text Up and Rotate textdown.
4) Based on your selection the text is changed.
Please find the screen show below where for each option one sample is provided in the below secreen shot.
Here in this article I am going to explain How to send formatted text messages in WhatsApp Chat in Android Phones.
If you want to send Message in Bold type add the asterisk (*) before and after your text message
*text*
If you want to send Message in Italic type add the underscore (_) before and after your text message
_text_
If you want to send Message as Strikethrough add a tilde (~) before and after your text message
~text~
If you want to send Message as Monospace type three backticks before and after your text message
```text```
Also in Android phone we can use the shotcuts by Tap and hold the text that is entering in the text field and then select the options that are available for the bold, italic in the list.
You can also check in the youtube link https://youtu.be/xegyvE8RVfs
In this artcile I am going to explain How to Disable the Lock Screen Wallpaper Carousel. Please find the steps below to disable to Wallpaper Carousel..
Steps:
1) In mobile phone click on the Settings.
2) In the Settings -> Search Box type the text Wallpaper.
3) It will display all the apps that are having the text Wallpaper. Select the Wallpaper Carousel.
4) When you click the Wallpaper Carousel it will display the Option Turn On or Off button.
5) Click the Turn On or Off Button to Enable or Disable the Wallpaper Carousel on mobile phone Lock Screen.
In this article I am going to explain how to Edit or Delete Gmail Contats.
Steps :
1. Login into your GMAIL Account.
2. Open the Link in the another tab https://contacts.google.com/
3. It will display all the contacts that are available in your gmail account.
4. Move the cursor on the contact which you need to edit. It will dislay the Edit Contact option. Click on Edit it will open a popup window. Now you can edit the contact details and click on save. Please check the screen shot below.
5. To Delete the contact, Move the cursor to the contact you want to delete. In the Contact it will show three dots. Click on the three dots it will show you the menu item where you can select the delete option. It will remove the contact from your contact list. Please check the screen shot below
In this article I am going to explain how to Close your LinkedIn account permanently deleting your profile and removing access to all your LinkedIn information from the site.
Steps:
To close your LinkedIn account
Step1: You need to LogIn into your LinkedIn account.
Step2: Select the tab under your profile picture in the top toolbar
Step3: Select the option “Settings and Privacy” from the dropdown menu
Step4: In the “Account” tab select the option “Closing Your LinkedIn Account”
Step5: You can select the reason for closing your account and click “Next” button. Select the option “other” if none of the reasons apply to you and then you click “Next” button.
Step6: Enter your password and select the option “Close Account” button.
I am going to explain Microsoft Excel Date funtions in the below article. Microsoft Excel provides a bunch of Date functions to work with dates and times values. Here I am going to explain most of the time we use to calculate Age, Date formats and difference between two days with the samples.
TEXT Funtion
The TEXT function uses to convert dates to a text string.
Syntax : TEXT(value, format_text)
With the syntax of TEXT(value, format_text) function, we can change the dates to text strings in a variety of formats. Some sample formats are as explained in the following below screenshot.
DATEDIF Funtions
DATEDIF function is used to calculate the difference between two dates in days, months or years.
Syntax : DATEDIF(start_date, end_date, unit)
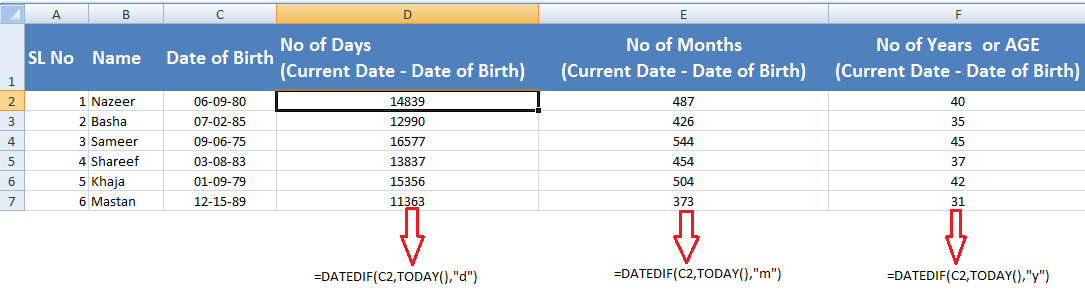
We have to provide the Unit argument as d, m or y to retun the no of days, months or years. Below I have provided the sample and also the same explained in the screen shot.
=DATEDIF(C2, TODAY(), "d") - This will calculates the number of days between the cell value in C2 and today's date.
=DATEDIF(C2, TODAY(), "m") - This will returns the number of complete months between the dates in C2 and today's date.
=DATEDIF(C2, TODAY(), "y") - This will returns the number of complete years between the dates in C2 and today's date.
Calculating the difference between two dates columns are explained in the below screen shot. The screen shot showing is no of years differrence in the two days. If you want no of days between the two days you have to give unit section as d instedad of y in quotation marks.
In this artcile I am going to explain how to Change PIN in Two step verification in WhatsApp. We have an option to change the PIN or update the email address associated with two-step verification.
To Enable the Two Step verification please follow the Below Steps:
1) Click on three dots in WhatsApp right top righ side and click on WhatsApp Settings.
2) Now Clik on Account > Clik on Two-step verification > Clik on Change PIN.
3) In the Next screen it will ask for the Six Digit secret PIN Number.
4) Enter a six-digit PIN of your choice and confirm it.
7) Click on Save and Your PIN Set.
You can also check the Change PIN in two steps verifiation in the below Youtube Channel. How to Change PIN in Two step verification in WhatsApp
Check the below steps if you want to Add or Chane the Email Addres in WhatsApp Two Step Verification
To Add an email address.
1) Click on three dots in WhatsApp right top righ side and click on WhatsApp Settings.
2) Click on Account > Click on Two-step verification > Click on Add Email Address.
To Change an email address.
1) Click on three dots in WhatsApp right top righ side and click on WhatsApp Settings.
2) Click on Account > Click on Two-step verification > Click on Change Email Address.